Gesture and Motion
Last weekend, I sent out a video demonstrating how to use the Microbit gesture feature to control the Microbit. This week, we will dig deeper to understand what enables these gesture feature. This is achieved through a sensor called accelerometer.
Did you ever wonder how does your phone know which way you are holding it, and rotate the photo for you? It is by using accelerometer.
Accelerometer has also been used to create context awared toys. For example, this Talkie toy sense the gesture of the stuffy, and produce giggleing sound when it is shaken, talks “Weee” when it is up side down, etc.
After this lesson, you will know all the secret of this toy, and you will also be amazed for such a high price tag that the manufactuer put on these sort of toys. At least, I am. LOL.

Accelerometer Data
Now let’s take a closer look at the Microbit’s accelerometer, and learn how we can use these data to determine the gesture of our Microbit.
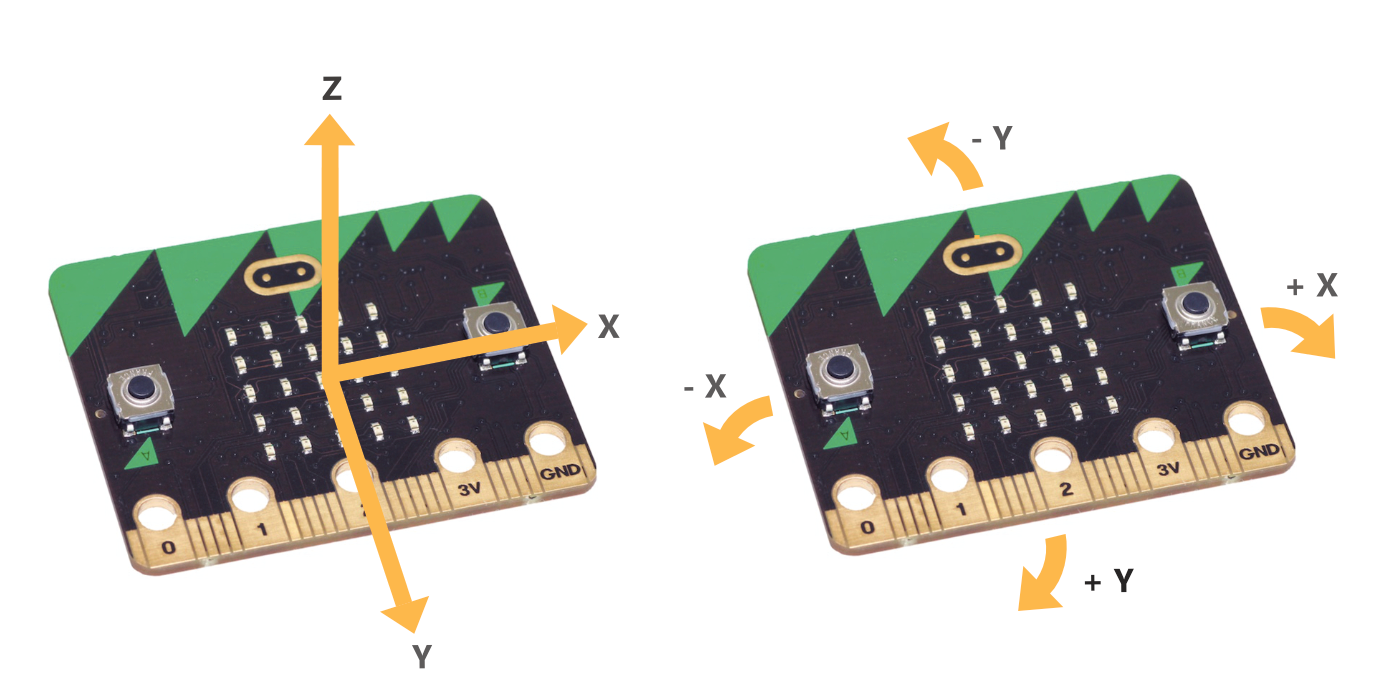
First of all, the measure motion in the physical world, which is a 3D world, we need to define a 3D axes: X, Y, and Z
Our Microbit measure acceleration in these 3 axes.

To have a better sense about the axes, let’s shake our microbit along each of these axis, and observe the accelerometer reading. Open the project below in your MakeCode, and download the program to your Microbit.
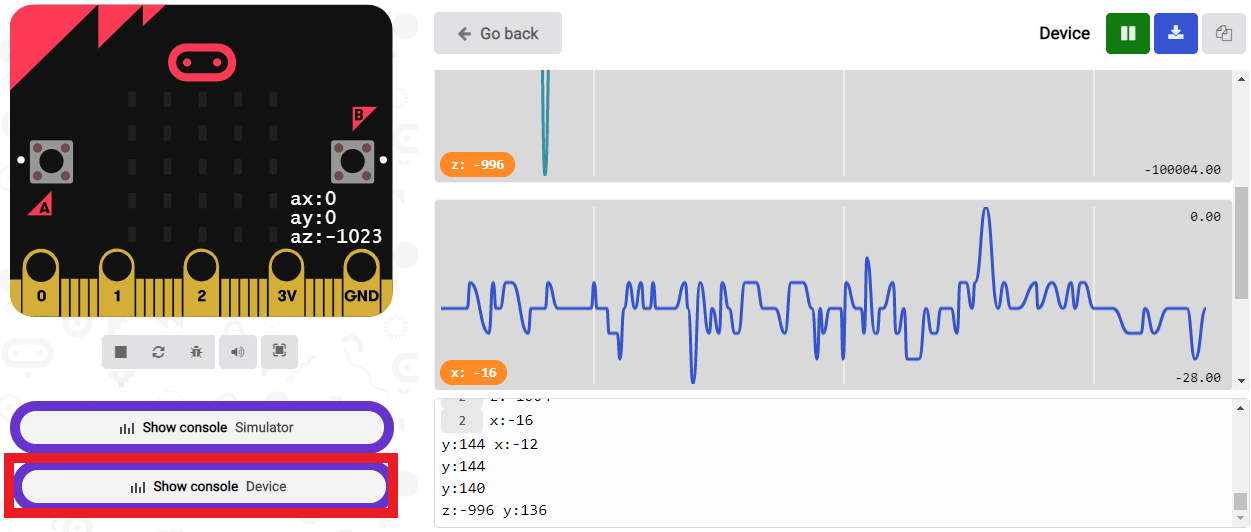
After downloading this program to your Microbit, you will see the Show Console Device button show up below the Microbit Simulator. Click that, and you will see a page like the image below. This page will show your accelerometer reading in real time. Shake your Microbit along the three axes seperatly and get a feel about accelerometer data.

Here is a little summary of our observation:
- When we shake along X, we see big violent changes (from -1500 to +1500) on our X plot.
- We also see some activities on the other axes, but with a smaller amplitude. This is because our motion is not precisely only on one axis. Motion usually happens on all axis, just more or less on certain axis.
- If we add motion along all three axes to gether, we have a strength. This is what Microbit to determine Shake gesture.
- There are lots of noise on the accelerometer reading. It keeps changing.
Now let’s load another project that’s going to give ue the gesture indicator, and showing accelerometer reading at a slower speed. Now let’s observe how Microbit determines gesture from the accelerometer data.
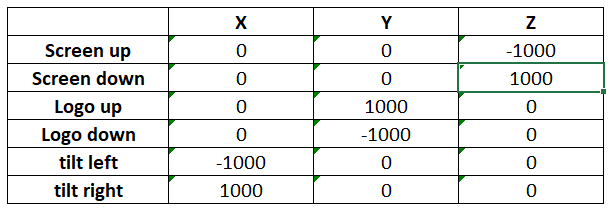
A table summary on the gesture detection:

We can see by checking which axis senes the earth’s gravity (which reads about 1000 by the accelerometer constantly), we can determine the orientation of the Microbit.
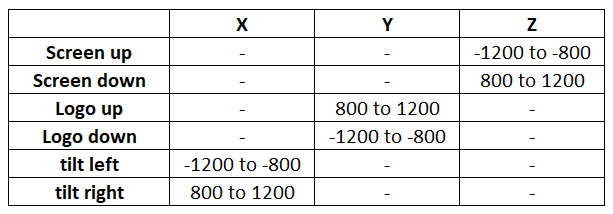
However, data is full of noise. And we don’t necessarily orient the Microbit perfectly. Therefore we need to set a range to determine the orientation. We will use the following table instead of a fixed value.

Now, let’s do a small in class exercise:
Our Task
- Modify the gesture indicator to use our own number to determine gesture
- For example, use
z > -1200 and z < -800detect screen up gesture
Block:
Go to microbit.org/join
Python:
Start with this template:
while True:
    serial.write_value("x", input.acceleration(Dimension.X))
    serial.write_value("Y", input.acceleration(Dimension.Y))
    serial.write_value("Z", input.acceleration(Dimension.Z))
    serial.write_value("S", input.acceleration(Dimension.STRENGTH))
    if ():
        basic.show_string("Shake")
    elif ():
        basic.show_string("Logo Up")
    elif ():
        basic.show_string("Logo Down")
    elif ():
        basic.show_string("Screen Up")
    elif ():
        basic.show_string("Screen Down")
    elif ():
        basic.show_string("Tilt Left")
    elif ():
        basic.show_string("Tilt Right")
    else:
        basic.show_icon(IconNames.HEART)

def on_forever():
    pass
basic.forever(on_forever)
Two Weeks Project
- Create a Halloween theme project. Some ideas could be:
- Use any of the sensors we’ve learned so far: LEDs, light sensors, temperature, accelerometers, button
- DIY motion sensitive light up Halloween costume
- Halloween decoration
- Make Halloween theme Scratch game controlled by Microbit. Download Microbit program here: Microbit for Scratch
Get Inspired:
- A glowing Wand project example:
- Halloween Light Box (Twitter post)
- Microbit Powered Pumpkin (Twitter post)
- Use Microbit to control LEDs (Twitter post)
- Microbit Costume (Twitter post)
- Microbit controlled Scratch game (Twitter post)
- A costume for Microbit? (Twitter post)
- Another costume for Microbit (Twitter post)
- Microbit as eye (Twitter post)